When handling collisions in a game, there comes a time when you don’t want everything to collide with everything else. To help you achieve this, you can use collision layers to define which layers collide with each other. In this post, I will explain the basics of collision layers.
Setting up Collision Layers
Collision layers and layers are generally the same; the wording just makes it easier to talk with others. While having a GameObject selected, you can easily set the layer on the top, right next to the tag:
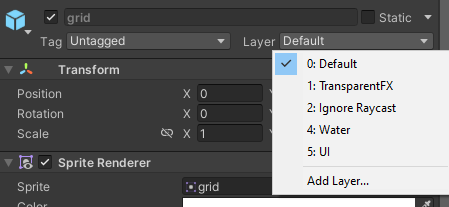
A few layers are already predefined, but you can easily add another layer by clicking “Add layer…”
Defining Collision Layers
To define which layers collide with each other, go to “Edit” -> “Project Settings…” -> “Physics“. There you will find a Collision Matrix like this one:
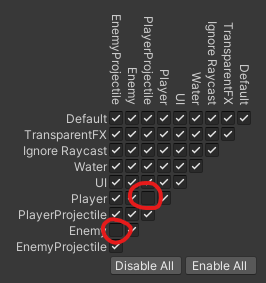
Here you can see that everything can collide with everything, except for two exceptions: the “PlayerProjectile” does not collide with the “Player,” and the “EnemyProjectile” does not collide with the “Enemy.” Collision events will only be triggered when the objects’ layers can collide with each other.
Conclusion
In conclusion, collision layers are an important aspect of game development that can help you optimize your game’s performance and create a more engaging gameplay experience. By defining which layers collide with each other, you can fine-tune your game and create a more polished end product. For more information on layers, you can visit the official Unity documentation.